

Technitium DNS – Cluster, Adblock, MySQL Logs

Seit Version 14 bietet Technitium DNS die Möglichkeit, mehrere Instanzen als Cluster zu betreiben. Alle Technitium DNS Server synchronisieren ihre Einstellungen dabei nahezu in Echtzeit. Ein DNS-Cluster bietet neben den Vorteilen der zentralen Verwaltung über eine beliebige Instanz auch mehr Ausfallsicherheit.

In diesem Beitrag erstellen wir ein Setup aus drei (virtuellen) Debian 13 mit Technitium DNS, Adblocking, der Cluster-Funktion und (optionalem) MariaDB/MySQL-Server für ein besseres Logging.

Inhalt

Vorbereitung

Für virtuelle Maschinen sollte vorab überlegt werden, ob die Technitium DNS Server auch die DHCP-Funktion im Netzwerk übernehmen sollen. Sobald Technitium auch als DHCP fungiert, ist eine bessere Nachverfolgung der Clients möglich. LXC sind für den Einsatz als DHCP-Server ungeeignet, dann sollte eine klassische VM gewählt werden. 

Das Setup

Wir verwenden insgesamt drei Debian 13 VMs auf verschiedenen Proxmox VE. 2 VMs agieren als Technitium DNS mit DHCP, die 3. VM als reiner MariaDB/MySQL-Server für Logging.

  • Technitium DNS Server 1

    • 2 vcore, 32GB vSSD, 4GB RAM, Debian 13, Multiqueue: 2

  • Technitium DNS Server 2

    • 2 vcore, 32GB vSSD, 4GB RAM, Debian 13, Multiqueue: 2

  • MariaDB Server

    • 2 vcore, 60GB vSSD, 4GB RAM, Debian 13, Multiqueue: 2

Base Tweaks für Debian 13

Wir setzen meistens Standardwerte als „Tweak“ für Debian 13 (Trim & Trim-Timer, Deaktivierung von Sleep-States):

📄
Base Tweaks
sudo fstrim -av && sudo systemctl enable fstrim.timer && systemctl mask sleep.target suspend.target hibernate.target hybrid-sleep.target

Technitium DNS Installation

Das Setup von Technitium DNS ist recht einfach. Unter Debian 13 muss vorab ein zusätzliches Paket (libicu) installiert werden: 

📄
libicu76
sudo apt update
sudo install libicu76 -y

Anschließend wird Technitium DNS über den „Installer“ klassisch installiert. Diese Schritte müssen auf beiden VMs ausgeführt werden:

📄
Technitium Installer
curl -sSL https://download.technitium.com/dns/install.sh | sudo bash

Grundkonfiguration Technitium DNS

Nach Abschluss der Installation ruft man die GUI über http://ip-adresse:5380 auf und vergibt im ersten Schritt zunächst ein neues Passwort.

Settings -> General

Hier werden Basiseinstellungen wie NIC-Bindungen für IPv4/IPv6, Default TTL, Query-Limits etc. gesetzt. Verfügt der Server über mehrere NICs und soll ggf. nur auf eine IP „lauschen“, kann das entsprechend angepasst werden. Im Regelfall sind die Default-Werte ausreichend.

Settings -> Web Service

Neben dem listening Port für HTTP kann hier des Protokoll auf HTTPS umgeswitcht werden. Technitium DNS unterstützt momentan nur Zertifikate im Format PFX oder P12. Das Zertifikat muss einen Private Key enthalten und in einem lokalen Verzeichnis auf dem Server vorhanden sein, bspw.: /opt/ssl/certificate.p12

Settings -> Optional Protocols

Neben klassischem DNS over UDP (Port 53) unterstützt Technitium DNS auch sämtliche „neuen“ Protokolle wie:

  • DNS-over-HTTP
  • DNS-over-TLS
  • DNS-over-HTTPS
  • DNS-over-HTTP3
  • DNS-over-QUIC

Auch hier gilt, dass ein gültiges Zertifikat auf dem Server vorhanden sein muss. 

Settings -> Recursion

Zur Sicherheit sollten Recursions nur aus RFC1918-Netzen erlaubt sein (default). 

Bei „Recursive Resolver“ können diese Optionen aktiviert werden:

  • Randomize Name
  • QNAME Minimization

Settings -> Cache

Der Cache von Technitium DNS wir default auf der Disk gespeichert und steht dann auch nach einem Reboot wieder zur Verfügung. Die Werte wie „Server Stale TTL“, „Cache Maximum Entries“ etc. können frei angepasst werden. 

Erstellung der sekundären Root-Zone

Wie andere DNS-Server auch, kann Technitium eine Kopie der Root-Zone vorhalten. Dann müssen keine Forwarder wie Cloudflare, Google, Quad9 o.ä. verwendet werden. Gleichzeitig erhöht dies die Anonymität und Unabhängigkeit. Dieser Schritt wird auf beiden Servern ausgeführt.

Zunächst navigiert man zu „Zones“ und wählt „Add Zone„:

  • Zone: . (nur einen Punkt eintragen)
  • Type: Secondary Zone
  • Primary Name Server Addresses: (siehe Liste unten)
  • Zone Transfer Protocol: XFR-over-TCP (default)
📄
Root Server IPs
192.0.47.132  
192.0.32.132  
199.9.14.201  
192.33.4.12  
199.7.91.13  
192.5.5.241  
192.112.36.4  
193.0.14.129

Direkt nach der Erstellung enthält die Kopie der Zone noch keine Einträge. Mit einem Klick auf den „Refresh“-Button kann die Anzeige aktualisiert werden:

Erstellung des Clusters

Die Einrichtung der Cluster-Funktion ist relativ einfach gehalten. Auf einem der Server navigiert man zunächst zu „Administration“ -> „Cluster“ und und wählt bei „Intialize“ -> „New Cluster„:

Hinweis: beim FQDN für die sog. „Cluster Domain“ sollte keine „reale“ Domain verwendet werden, die ggf. mit späteren Auflösungen kollidieren kann! Es empfiehlt sich, einen rein lokalen FQDN zu verwenden:

Die IP & URL des „Primary“ Servers notiert man sich für den Beitritt des 2. Technitium DNS Servers:

Auf dem 2. Technitium DNS Server ruft man nun „Administration“ -> „Cluster“ -> „Initialize“ -> „Join Cluster“ auf:

Über „Quick Add“ fügt man die (eigene) IP des 2. Servers hinzu sowie die Primary Node URL und die IP des 1. Servers. Unter „Certificate Validation“ kann gewählt werden, ob das Zertifikat des Primary Servers überprüft werden soll. Dies setzt natürlich ein gültiges Zertifikat voraus. Andernfalls wählt man „Ignore Certificate Validation Errors„. Abschließend trägt man den Usernamen und das Passwort des 1. Servers ein und wählt „Join„:

Adblocking einrichten

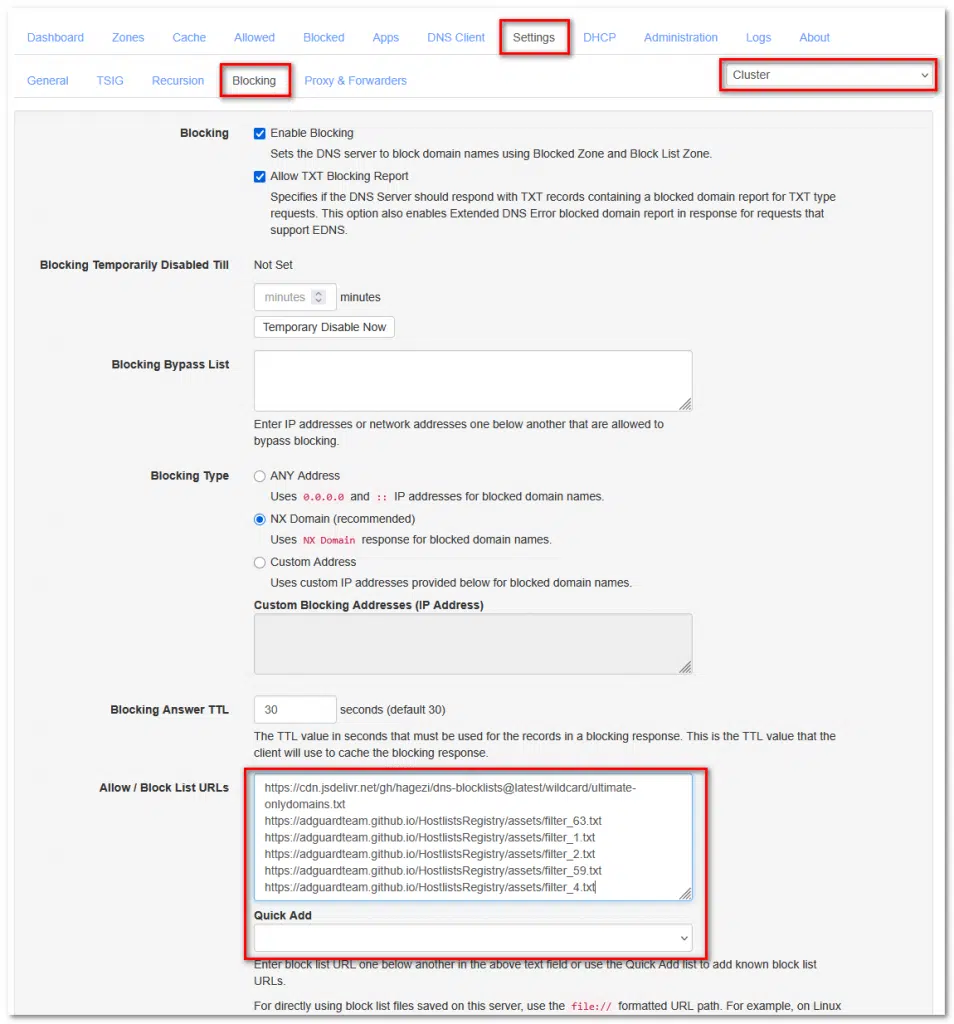
Ähnlich wie Pi-Hole, Adguard Home, etc. kann auch Technitium DNS unerwünschte Domains mittels Listen und/oder DNSBL blockieren. Hierzu wählt man auf einem der Server „Settings“ -> „Blocking„. Auf der rechten Seite ist der Cluster vorausgewählt. Das bedeutet: werden Listen (Allow/Bypass) gesetzt, sind diese für alle Technitium DNS Server aktiv. Im Feld „Allow / Block List URLs“ können die gewünschten URLs eingegeben werden, via „Quick Add“ stellt Technitium eine Auswahl an den „bekannten“ Blocklists bereit. Sobald man die Einstellungen gespeichert hat, sollte die gleichen Werte innerhalb weniger Sekunden auf dem 2. Server identisch vorhanden sein:
Blocking via RegEx

Anders als bspw. Adguard Home benötigt Technitium DNS für RegEx ein sog. „App“, die kostenlos über den integrierten „App Store“ installiert werden kann. Hierzu auf „Apps“ -> „App Store“ und die App „Advanced Blocking“ installieren:

Über „Config“ kann nun das Config-File direkt bearbeitet werden:

Beispielinhalte für RegEx:

📄
Root Server IPs
{
  "enableBlocking": true,
  "blockingAnswerTtl": 30,
  "blockListUrlUpdateIntervalHours": 24,
  "localEndPointGroupMap": {
    "0.0.0.0": "everyone"
  },
  "networkGroupMap": {
    "0.0.0.0/0": "everyone",
    "[::]/0": "everyone"
  },
  "groups": [
    {
      "name": "everyone",
      "enableBlocking": true,
      "allowTxtBlockingReport": true,
      "blockAsNxDomain": true,
      "blockingAddresses": [
        "0.0.0.0",
        "::"
      ],

      "allowed": [],
      "blocked": [],

      "allowListUrls": [],
      "blockListUrls": [],

      "allowedRegex": [],

      "blockedRegex": [
        "^(.+[_.-])?adse?rv(er?|ice)?s?[0-9]*[_.-]",
        "^(.+[_.-])?telemetry[_.-]",
        "^ad([sxv]?[0-9]*|system)[_.-]([^.[:space:]]+\\.){1,}|[_.-]ad([sxv]?[0-9]*|system)[_.-]",
        "^adim(age|g)s?[0-9]*[_.-]",
        "^adtrack(er|ing)?[0-9]*[_.-]",
        "^advert(s|is(ing|ements?))?[0-9]*[_.-]",
        "^aff(iliat(es?|ion))?[_.-]",
        "^analytics?[_.-]",
        "^banners?[_.-]",
        "^beacons?[0-9]*[_.-]",
        "^count(ers?)?[0-9]*[_.-]",
        "^mads\\.",
        "^pixels?[-.]",
        "^stat(s|istics)?[0-9]*[_.-]"
      ],

      "regexAllowListUrls": [],
      "regexBlockListUrls": [],

      "adblockListUrls": []
    }
  ]
}

MariaDB/MySQL Server für Logging

Technitium DNS kann sämtliche Abfragen in eine MariaDB/MySQL loggen. Alternativ kann auch eine lokale SQLite verwendet werden. Diese ist aber nur für kleinere Setups gedacht. Stabiler und performanter ist ein „echter“ DB-Server. Dabei können alle Cluster-Mitglieder in eine DB schreiben.

MariaDB Base-Install und Absicherung

📄
MariaDB Base-Install
apt update
apt install -y mariadb-server
systemctl status mariadb
📄
Root Passwort setzen
mysql
ALTER USER 'root'@'localhost'
IDENTIFIED BY 'SuperSicheresPasswort';
FLUSH PRIVILEGES;
EXIT;

Anpassung der 50-server.cnf

Wir passen zunächst die CNF an. Diese wird unter /etc/mysql/mariadb.conf.d/50-server.cnf abgelegt. Abhängig vom Unterbau gibt es verschiedene Möglichkeiten.  

✅ V1 – kleiner Host | 2 vCPU / 4GB RAM

➡️ konservativ, swap-sicher, stabil, für 1-2 Technitium DNS nodes < 1 Millionen Queries pro Tag

📄
V1
[server]

[mariadbd]

# Basic
pid-file                = /run/mysqld/mysqld.pid
basedir                 = /usr
bind-address            = 0.0.0.0
skip-name-resolve

# Performance – small host
innodb_buffer_pool_size         = 1G
innodb_log_file_size            = 256M
innodb_flush_log_at_trx_commit  = 2
innodb_flush_method             = O_DIRECT

innodb_io_capacity              = 800
innodb_io_capacity_max          = 1600

max_connections                 = 100
expire_logs_days                = 10

[mariadb-11.8]

✅ V2 – Standard | 4 vCPU / 8GB RAM

➡️ sweet-spot, mehrere Technitium DNS nodes 5-20 Millionen Queries pro Tag

📄
V2
[server]

[mariadbd]

# Basic
pid-file                = /run/mysqld/mysqld.pid
basedir                 = /usr
bind-address            = 0.0.0.0
skip-name-resolve

# Performance – medium host
innodb_buffer_pool_size         = 4G
innodb_log_file_size            = 1G
innodb_flush_log_at_trx_commit  = 2
innodb_flush_method             = O_DIRECT

innodb_io_capacity              = 2000
innodb_io_capacity_max          = 4000

max_connections                 = 200
expire_logs_days                = 10

[mariadb-11.8]

✅ V3 – größerer Server | 6 vCPU / 16GB RAM

➡️ hohe Last, viele Clients, mehrere Technitium DNS nodes, >20 Millionen Queries pro Tag

📄
V3
[server]

[mariadbd]

# Basic
pid-file                = /run/mysqld/mysqld.pid
basedir                 = /usr
bind-address            = 0.0.0.0
skip-name-resolve

# Performance – large host
innodb_buffer_pool_size         = 8G
innodb_log_file_size            = 2G
innodb_flush_log_at_trx_commit  = 2
innodb_flush_method             = O_DIRECT

innodb_io_capacity              = 4000
innodb_io_capacity_max          = 8000

max_connections                 = 300
expire_logs_days                = 10

[mariadb-11.8]

Nach dem Erstellen der CNF den MariaDB Server neustarten mit:

📄
Restart MariaDB Server
systemctl restart mariadb

User & Datenbank anlegen

Wir erzeugen die DB „technitium_querylog“ sowie den dazugehörenden User „techdns“ mit dem Passwort „Secure123!“ (User & Passwort können natürlich frei gewählt werden):

📄
Log in as root
mysql -u root -p
📄
Create DB & User
CREATE DATABASE technitium_querylog
CHARACTER SET utf8mb4
COLLATE utf8mb4_unicode_ci;

CREATE USER 'techdns'@'%'
IDENTIFIED BY 'Secure123!';

GRANT ALL PRIVILEGES
ON technitium_querylog.*
TO 'techdns'@'%';

FLUSH PRIVILEGES;
EXIT;

MariaDB Server mit Technitium DNS verbinden

Vorab installiert man via „Apps“ -> „App Store“ die App „Query Logs (MySQL)“ und ruft anschließend die Config auf:

Die nachstehende Config ist für die VM mit 2 vCPU und 4GB RAM ausgelegt.

  • maxQueueSize: der Wert kann bei DB-Servern mit mehr Leistung entsprechend erhöht werden (200k, 500k, usw.). Zu hohe Werte bei DB-Servern mit wenig Leistung führen zu Flush-Spikes und RAM-Overload.
  • maxLogDays: die Anzahl der Tage, für wie lange die Queries in der DB verbleiben sollen

Im Feld „connectionString“ müssen IP, Port, User und Passwort entsprechend dem eigenen Setup angepasst werden:

📄
App Config Query Logs MySQL
{
  "enableLogging": true,

  "maxQueueSize": 200000,

  "maxLogDays": 60,
  "maxLogRecords": 0,

  "databaseName": "technitium_querylog",

  "connectionString": "Server=192.168.133.3;Port=3306;Uid=techdns;Pwd=Secure123!;SslMode=None;"
}

Finaler Test - Lookup starten und Query Log

Auf einem beliebigen Client mittels NSLOOKUP jeweils eine Domain auf einem der Technitium DNS abfragen (in diesem Beispiel die 192.168.133.1 & 192.168.133.2:

📄
NSLOOKUP
nslookup peetzcom.de 192.168.133.1

nslookup google.de 192.168.133.2

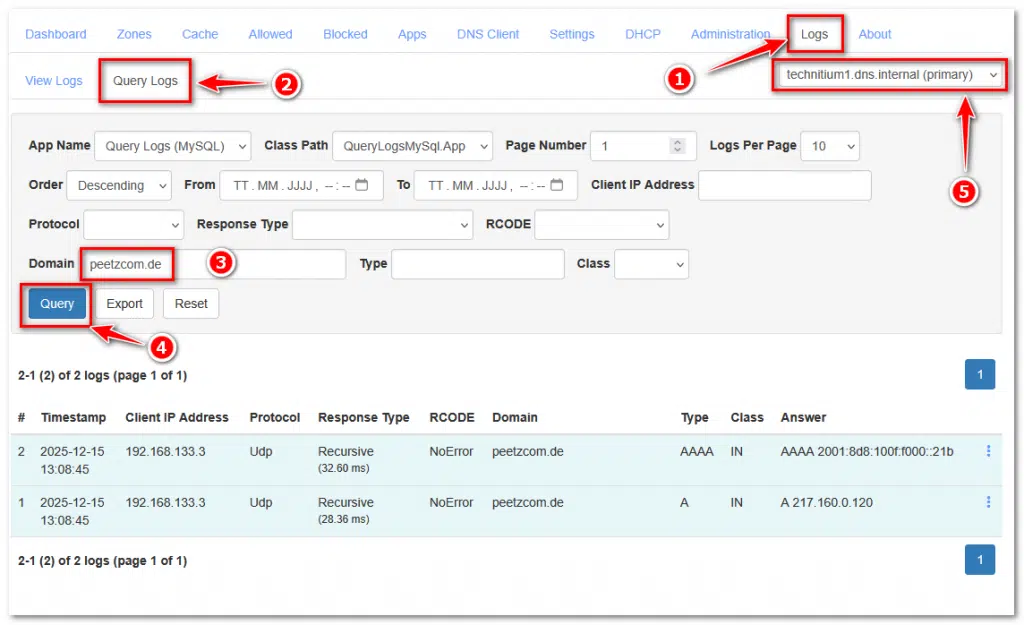
Dann auf einem der Hosts „Logs“ -> „Query Logs„. ausführen. 

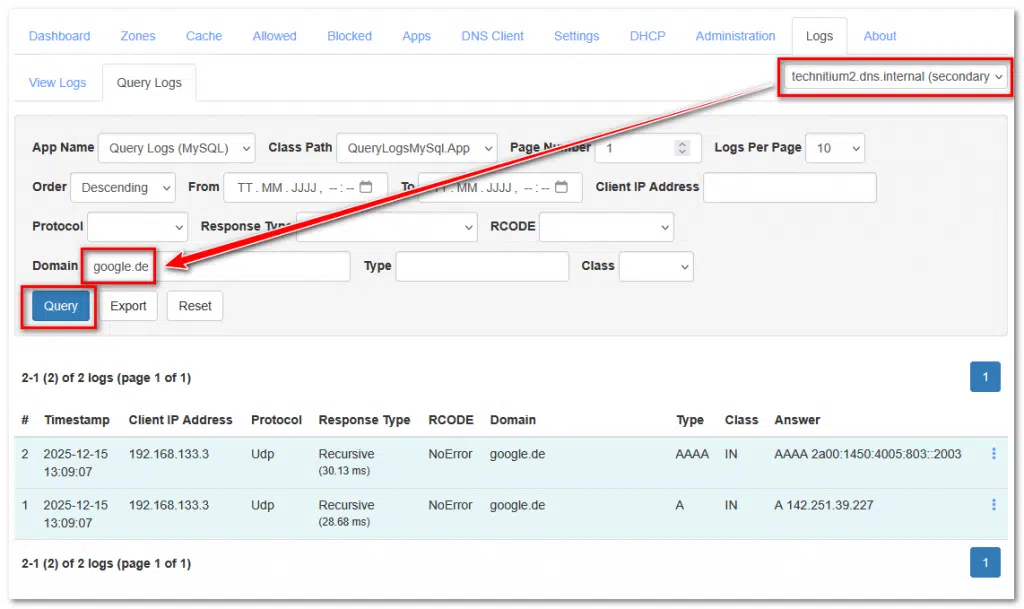
Für die TLD peetzcom.de wurde der 1. Server gefragt, für google.de der 2. Server. Über die Auswahl am oberen rechten Rand kann der Server gewechselt werden:
1 Kommentar zu „Technitium DNS – Cluster, Adblock, MySQL Logs“

  1. Pingback: Technitium DNS - eine Alternative zu Unbound - PeetzCOM IT-Services

Schreibe einen Kommentar

Deine E-Mail-Adresse wird nicht veröffentlicht. Erforderliche Felder sind mit * markiert

Since version 14, Technitium DNS has offered the ability to run multiple instances as a cluster. All Technitium DNS servers synchronize their settings in near real time. In addition to the benefits of centralized management via any instance, a DNS cluster also provides increased fault tolerance.

In this post, we create a setup consisting of three (virtual) Debian 13 systems with Technitium DNS, ad blocking, the cluster feature, and an (optional) MariaDB/MySQL server for improved logging.

Content

Preparation

For virtual machines, it should be considered in advance whether the Technitium DNS servers should also take over the DHCP function in the network. Once Technitium also acts as a DHCP server, improved client tracking becomes possible. LXCs are not suitable for use as DHCP servers; in this case, a classic virtual machine should be used.

The setup

We use a total of three Debian 13 virtual machines on different Proxmox VE hosts. Two VMs act as Technitium DNS servers with DHCP, while the third VM serves solely as a MariaDB/MySQL server for logging.

  • Technitium DNS Server 1

    • 2 vcore, 32GB vSSD, 4GB RAM, Debian 13, Multiqueue: 2

  • Technitium DNS Server 2

    • 2 vcore, 32GB vSSD, 4GB RAM, Debian 13, Multiqueue: 2

  • MariaDB Server

    • 2 vcore, 60GB vSSD, 4GB RAM, Debian 13, Multiqueue: 2

Base Tweaks for Debian 13

We usually apply standard values as a “tweak” for Debian 13 (TRIM and TRIM timer, disabling sleep states):

📄
Base Tweaks
sudo fstrim -av && sudo systemctl enable fstrim.timer && systemctl mask sleep.target suspend.target hibernate.target hybrid-sleep.target

Technitium DNS Installation

The setup of Technitium DNS is quite straightforward. On Debian 13, an additional package (libicu) must be installed beforehand:

📄
libicu76
sudo apt update
sudo install libicu76 -y

Afterwards, Technitium DNS is installed in the classic way using the “installer”. These steps must be performed on both VMs:

📄
Technitium Installer
curl -sSL https://download.technitium.com/dns/install.sh | sudo bash

Base configuration Technitium DNS

After completing the installation, the GUI is accessed via http://ip-address:5380, where a new password is set in the first step.

Settings -> General

Basic settings such as NIC bindings for IPv4/IPv6, default TTL, query limits, and more are configured here. If the server has multiple NICs and should only listen on a specific IP, this can be adjusted accordingly. In most cases, the default values are sufficient.

Settings -> Web Service

In addition to the listening port for HTTP, the protocol can be switched to HTTPS here. Technitium DNS currently supports certificates only in PFX or P12 format. The certificate must contain a private key and be available in a local directory on the server, for example: /opt/ssl/certificate.p12

Settings -> Optional Protocols

In addition to classic DNS over UDP (port 53), Technitium DNS also supports all modern protocols such as:

  • DNS-over-HTTP
  • DNS-over-TLS
  • DNS-over-HTTPS
  • DNS-over-HTTP3
  • DNS-over-QUIC

Here as well, a valid certificate must be available on the server.

Settings -> Recursion

For security reasons, recursion should only be allowed from RFC1918 networks (default).

Under “Recursive Resolver”, the following options can be enabled:

  • Randomize Name
  • QNAME Minimization

Settings -> Cache

By default, the Technitium DNS cache is stored on disk and is therefore available again after a reboot. Values such as “Server Stale TTL”, “Cache Maximum Entries”, and others can be adjusted freely.

Creating the Secondary Root Zone

Like other DNS servers, Technitium can maintain a copy of the root zone. This removes the need to use forwarders such as Cloudflare, Google, Quad9, and others. At the same time, this increases anonymity and independence. This step is performed on both servers.

First, navigate to “Zones” and select “Add Zone”:

  • Zone: . (add only one dot)
  • Type: Secondary Zone
  • Primary Name Server Addresses: (see list below)
  • Zone Transfer Protocol: XFR-over-TCP (default)
📄
Root Server IPs
192.0.47.132  
192.0.32.132  
199.9.14.201  
192.33.4.12  
199.7.91.13  
192.5.5.241  
192.112.36.4  
193.0.14.129

Immediately after creation, the copy of the zone does not yet contain any entries. Clicking the “Refresh” button updates the view.

Creating the cluser

Setting up the cluster feature is relatively straightforward. On one of the servers, first navigate to “Administration” > “Cluster” and select “Initialize” > “New Cluster”:

Note: For the FQDN of the so-called “cluster domain”, no “real” domain should be used, as this could potentially conflict with future name resolutions. It is recommended to use a purely local FQDN:

The IP address and URL of the primary server should be noted for joining the second Technitium DNS server:
`

On the second Technitium DNS server, navigate to “Administration” > “Cluster”> “Initialize” > “Join Cluster”:

Using “Quick Add”, add the (local) IP address of the second server as well as the primary node URL and the IP address of the first server. Under “Certificate Validation”, you can choose whether the certificate of the primary server should be validated. This naturally requires a valid certificate. Otherwise, select “Ignore Certificate Validation Errors”. Finally, enter the username and password of the first server and select „Join“

Adblock configuration

Similar to Pi-hole, AdGuard Home, and others, Technitium DNS can also block unwanted domains using lists and/or DNSBL. To do this, select “Settings” > “Blocking” on one of the servers. On the right-hand side, the cluster is preselected. This means that when allow or bypass lists are configured, they are active on all Technitium DNS servers. In the “Allow / Block List URLs” field, the desired URLs can be entered; via “Quick Add”, Technitium provides a selection of well-known blocklists. Once the settings are saved, the same values should appear identically on the second server within a few seconds.

Blocking via RegEx

Unlike, for example, AdGuard Home, Technitium DNS requires a so-called “app” for RegEx, which can be installed for free via the integrated “App Store”. To do this, navigate to “Apps” > “App Store” and install the app “Advanced Blocking”:

Via “Config”, the configuration file can now be edited directly:

Sample for RegEx:

📄
Root Server IPs
{
  "enableBlocking": true,
  "blockingAnswerTtl": 30,
  "blockListUrlUpdateIntervalHours": 24,
  "localEndPointGroupMap": {
    "0.0.0.0": "everyone"
  },
  "networkGroupMap": {
    "0.0.0.0/0": "everyone",
    "[::]/0": "everyone"
  },
  "groups": [
    {
      "name": "everyone",
      "enableBlocking": true,
      "allowTxtBlockingReport": true,
      "blockAsNxDomain": true,
      "blockingAddresses": [
        "0.0.0.0",
        "::"
      ],

      "allowed": [],
      "blocked": [],

      "allowListUrls": [],
      "blockListUrls": [],

      "allowedRegex": [],

      "blockedRegex": [
        "^(.+[_.-])?adse?rv(er?|ice)?s?[0-9]*[_.-]",
        "^(.+[_.-])?telemetry[_.-]",
        "^ad([sxv]?[0-9]*|system)[_.-]([^.[:space:]]+\\.){1,}|[_.-]ad([sxv]?[0-9]*|system)[_.-]",
        "^adim(age|g)s?[0-9]*[_.-]",
        "^adtrack(er|ing)?[0-9]*[_.-]",
        "^advert(s|is(ing|ements?))?[0-9]*[_.-]",
        "^aff(iliat(es?|ion))?[_.-]",
        "^analytics?[_.-]",
        "^banners?[_.-]",
        "^beacons?[0-9]*[_.-]",
        "^count(ers?)?[0-9]*[_.-]",
        "^mads\\.",
        "^pixels?[-.]",
        "^stat(s|istics)?[0-9]*[_.-]"
      ],

      "regexAllowListUrls": [],
      "regexBlockListUrls": [],

      "adblockListUrls": []
    }
  ]
}

MariaDB/MySQL server for logging

Technitium DNS can log all queries to a MariaDB/MySQL database. Alternatively, a local SQLite database can be used, but this is intended only for smaller setups. A dedicated database server is more stable and performant. All cluster members can write to the same database.

MariaDB Base installation and hardening

📄
MariaDB Base-Install
apt update
apt install -y mariadb-server
systemctl status mariadb
📄
Root Passwort setzen
mysql
ALTER USER 'root'@'localhost'
IDENTIFIED BY 'SuperSicheresPasswort';
FLUSH PRIVILEGES;
EXIT;

Adjusting 50-server.cnf

First, we adjust the CNF file. It is located at /etc/mysql/mariadb.conf.d/50-server.cnf. Depending on the underlying setup, there are different possible appro

✅ V1 – small | 2 vCPU / 4GB RAM

➡️ conservative, swap-safe, stable, for 1–2 Technitium DNS nodes < 1 million queries per day

📄
V1
[server]

[mariadbd]

# Basic
pid-file                = /run/mysqld/mysqld.pid
basedir                 = /usr
bind-address            = 0.0.0.0
skip-name-resolve

# Performance – small host
innodb_buffer_pool_size         = 1G
innodb_log_file_size            = 256M
innodb_flush_log_at_trx_commit  = 2
innodb_flush_method             = O_DIRECT

innodb_io_capacity              = 800
innodb_io_capacity_max          = 1600

max_connections                 = 100
expire_logs_days                = 10

[mariadb-11.8]

✅ V2 – Standard | 4 vCPU / 8GB RAM

➡️ sweet spot, multiple Technitium DNS nodes, 5–20 million queries per day

📄
V2
[server]

[mariadbd]

# Basic
pid-file                = /run/mysqld/mysqld.pid
basedir                 = /usr
bind-address            = 0.0.0.0
skip-name-resolve

# Performance – medium host
innodb_buffer_pool_size         = 4G
innodb_log_file_size            = 1G
innodb_flush_log_at_trx_commit  = 2
innodb_flush_method             = O_DIRECT

innodb_io_capacity              = 2000
innodb_io_capacity_max          = 4000

max_connections                 = 200
expire_logs_days                = 10

[mariadb-11.8]

✅ V3 – large server | 6 vCPU / 16GB RAM

➡️ high load, many clients, multiple Technitium DNS nodes,> 20 million queries per day

📄
V3
[server]

[mariadbd]

# Basic
pid-file                = /run/mysqld/mysqld.pid
basedir                 = /usr
bind-address            = 0.0.0.0
skip-name-resolve

# Performance – large host
innodb_buffer_pool_size         = 8G
innodb_log_file_size            = 2G
innodb_flush_log_at_trx_commit  = 2
innodb_flush_method             = O_DIRECT

innodb_io_capacity              = 4000
innodb_io_capacity_max          = 8000

max_connections                 = 300
expire_logs_days                = 10

[mariadb-11.8]

After creating the CNF file, restart the MariaDB server with:

📄
Restart MariaDB Server
systemctl restart mariadb

Create user & database

We create the database “technitium_querylog” as well as the corresponding user “techdns” with the password “Secure123!” (the username and password can of course be chosen freely):

📄
Log in as root
mysql -u root -p
📄
Create DB & User
CREATE DATABASE technitium_querylog
CHARACTER SET utf8mb4
COLLATE utf8mb4_unicode_ci;

CREATE USER 'techdns'@'%'
IDENTIFIED BY 'Secure123!';

GRANT ALL PRIVILEGES
ON technitium_querylog.*
TO 'techdns'@'%';

FLUSH PRIVILEGES;
EXIT;

Connecting Technitium DNS with MariaDB

First, install the app “Query Logs (MySQL)” via “Apps” > “App Store” and then open the configuration:

The following configuration is designed for a VM with 2 vCPUs and 4 GB of RAM.

  • maxQueueSize: this value can be increased accordingly on database servers with higher performance (200k, 500k, etc.) Excessively high values on low-performance database servers can lead to flush spikes and RAM overload.
  • maxLogDays: the number of days the queries should be retained in the database

In the “connectionString” field, the IP address, port, username, and password must be adjusted according to your own setup.

📄
App Config Query Logs MySQL
{
  "enableLogging": true,

  "maxQueueSize": 200000,

  "maxLogDays": 60,
  "maxLogRecords": 0,

  "databaseName": "technitium_querylog",

  "connectionString": "Server=192.168.133.3;Port=3306;Uid=techdns;Pwd=Secure123!;SslMode=None;"
}

Final test - start lookup and query log

Auf einem beliebigen Client mittels NSLOOKUP jeweils eine Domain auf einem der Technitium DNS abfragen (in diesem Beispiel die 192.168.133.1 & 192.168.133.2:

📄
NSLOOKUP
nslookup peetzcom.de 192.168.133.1

nslookup google.de 192.168.133.2

Then, on one of the hosts, navigate to “Logs” > “Query Logs”. execute.

For the TLD peetzcom.de, the 1st server was queried; for google.de, the 2nd server. The server can be switched using the selection in the upper-right corner.:

Schreibe einen Kommentar

Deine E-Mail-Adresse wird nicht veröffentlicht. Erforderliche Felder sind mit * markiert

Nach oben scrollen
WordPress Cookie Hinweis von Real Cookie Banner