
Since version 14, Technitium DNS has offered the ability to run multiple instances as a cluster. All Technitium DNS servers synchronize their settings in near real time. In addition to the benefits of centralized management via any instance, a DNS cluster also provides increased fault tolerance.
In this post, we create a setup consisting of three (virtual) Debian 13 systems with Technitium DNS, ad blocking, the cluster feature, and an (optional) MariaDB/MySQL server for improved logging.
Content
Preparation
For virtual machines, it should be considered in advance whether the Technitium DNS servers should also take over the DHCP function in the network. Once Technitium also acts as a DHCP server, improved client tracking becomes possible. LXCs are not suitable for use as DHCP servers; in this case, a classic virtual machine should be used.
The setup
We use a total of three Debian 13 virtual machines on different Proxmox VE hosts. Two VMs act as Technitium DNS servers with DHCP, while the third VM serves solely as a MariaDB/MySQL server for logging.
-
Technitium DNS Server 1
• 2 vcore, 32GB vSSD, 4GB RAM, Debian 13, Multiqueue: 2
-
Technitium DNS Server 2
• 2 vcore, 32GB vSSD, 4GB RAM, Debian 13, Multiqueue: 2
-
MariaDB Server
• 2 vcore, 60GB vSSD, 4GB RAM, Debian 13, Multiqueue: 2
Base Tweaks for Debian 13
We usually apply standard values as a “tweak” for Debian 13 (TRIM and TRIM timer, disabling sleep states):
sudo fstrim -av && sudo systemctl enable fstrim.timer && systemctl mask sleep.target suspend.target hibernate.target hybrid-sleep.targetTechnitium DNS Installation
The setup of Technitium DNS is quite straightforward. On Debian 13, an additional package (libicu) must be installed beforehand:
sudo apt update
sudo install libicu76 -y
Afterwards, Technitium DNS is installed in the classic way using the “installer”. These steps must be performed on both VMs:
curl -sSL https://download.technitium.com/dns/install.sh | sudo bashBase configuration Technitium DNS
After completing the installation, the GUI is accessed via http://ip-address:5380, where a new password is set in the first step.
Settings -> General
Basic settings such as NIC bindings for IPv4/IPv6, default TTL, query limits, and more are configured here. If the server has multiple NICs and should only listen on a specific IP, this can be adjusted accordingly. In most cases, the default values are sufficient.
Settings -> Web Service
In addition to the listening port for HTTP, the protocol can be switched to HTTPS here. Technitium DNS currently supports certificates only in PFX or P12 format. The certificate must contain a private key and be available in a local directory on the server, for example: /opt/ssl/certificate.p12
Settings -> Optional Protocols
In addition to classic DNS over UDP (port 53), Technitium DNS also supports all modern protocols such as:
- DNS-over-HTTP
- DNS-over-TLS
- DNS-over-HTTPS
- DNS-over-HTTP3
- DNS-over-QUIC
Here as well, a valid certificate must be available on the server.
Settings -> Recursion
For security reasons, recursion should only be allowed from RFC1918 networks (default).
Under “Recursive Resolver”, the following options can be enabled:
- Randomize Name
- QNAME Minimization
Settings -> Cache
By default, the Technitium DNS cache is stored on disk and is therefore available again after a reboot. Values such as “Server Stale TTL”, “Cache Maximum Entries”, and others can be adjusted freely.
Creating the Secondary Root Zone
Like other DNS servers, Technitium can maintain a copy of the root zone. This removes the need to use forwarders such as Cloudflare, Google, Quad9, and others. At the same time, this increases anonymity and independence. This step is performed on both servers.
First, navigate to “Zones” and select “Add Zone”:

- Zone: . (add only one dot)
- Type: Secondary Zone
- Primary Name Server Addresses: (see list below)
- Zone Transfer Protocol: XFR-over-TCP (default)

192.0.47.132
192.0.32.132
199.9.14.201
192.33.4.12
199.7.91.13
192.5.5.241
192.112.36.4
193.0.14.129
Immediately after creation, the copy of the zone does not yet contain any entries. Clicking the “Refresh” button updates the view.


Creating the cluser
Setting up the cluster feature is relatively straightforward. On one of the servers, first navigate to “Administration” > “Cluster” and select “Initialize” > “New Cluster”:

Note: For the FQDN of the so-called “cluster domain”, no “real” domain should be used, as this could potentially conflict with future name resolutions. It is recommended to use a purely local FQDN:

The IP address and URL of the primary server should be noted for joining the second Technitium DNS server:
`

On the second Technitium DNS server, navigate to “Administration” > “Cluster”> “Initialize” > “Join Cluster”:

Using “Quick Add”, add the (local) IP address of the second server as well as the primary node URL and the IP address of the first server. Under “Certificate Validation”, you can choose whether the certificate of the primary server should be validated. This naturally requires a valid certificate. Otherwise, select “Ignore Certificate Validation Errors”. Finally, enter the username and password of the first server and select “Join”


Adblock configuration
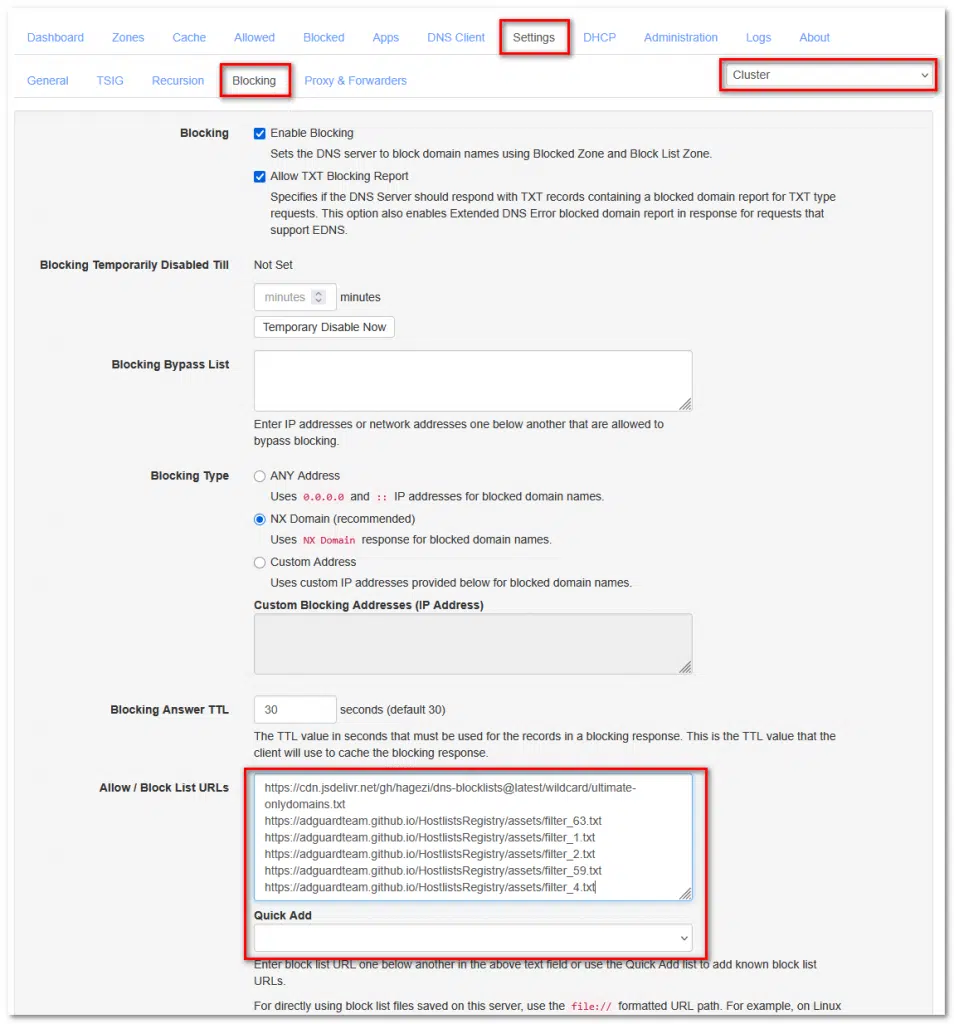
Similar to Pi-hole, AdGuard Home, and others, Technitium DNS can also block unwanted domains using lists and/or DNSBL. To do this, select “Settings” > “Blocking” on one of the servers. On the right-hand side, the cluster is preselected. This means that when allow or bypass lists are configured, they are active on all Technitium DNS servers. In the “Allow / Block List URLs” field, the desired URLs can be entered; via “Quick Add”, Technitium provides a selection of well-known blocklists. Once the settings are saved, the same values should appear identically on the second server within a few seconds.
Blocking via RegEx
Unlike, for example, AdGuard Home, Technitium DNS requires a so-called “app” for RegEx, which can be installed for free via the integrated “App Store”. To do this, navigate to “Apps” > “App Store” and install the app “Advanced Blocking”:


Via “Config”, the configuration file can now be edited directly:


Sample for RegEx:
{
  "enableBlocking": true,
  "blockingAnswerTtl": 30,
  "blockListUrlUpdateIntervalHours": 24,
  "localEndPointGroupMap": {
    "0.0.0.0": "everyone"
  },
  "networkGroupMap": {
    "0.0.0.0/0": "everyone",
    "[::]/0": "everyone"
  },
  "groups": [
    {
      "name": "everyone",
      "enableBlocking": true,
      "allowTxtBlockingReport": true,
      "blockAsNxDomain": true,
      "blockingAddresses": [
        "0.0.0.0",
        "::"
      ],

      "allowed": [],
      "blocked": [],

      "allowListUrls": [],
      "blockListUrls": [],

      "allowedRegex": [],

      "blockedRegex": [
        "^(.+[_.-])?adse?rv(er?|ice)?s?[0-9]*[_.-]",
        "^(.+[_.-])?telemetry[_.-]",
        "^ad([sxv]?[0-9]*|system)[_.-]([^.[:space:]]+\\.){1,}|[_.-]ad([sxv]?[0-9]*|system)[_.-]",
        "^adim(age|g)s?[0-9]*[_.-]",
        "^adtrack(er|ing)?[0-9]*[_.-]",
        "^advert(s|is(ing|ements?))?[0-9]*[_.-]",
        "^aff(iliat(es?|ion))?[_.-]",
        "^analytics?[_.-]",
        "^banners?[_.-]",
        "^beacons?[0-9]*[_.-]",
        "^count(ers?)?[0-9]*[_.-]",
        "^mads\\.",
        "^pixels?[-.]",
        "^stat(s|istics)?[0-9]*[_.-]"
      ],

      "regexAllowListUrls": [],
      "regexBlockListUrls": [],

      "adblockListUrls": []
    }
  ]
}
MariaDB/MySQL server for logging
Technitium DNS can log all queries to a MariaDB/MySQL database. Alternatively, a local SQLite database can be used, but this is intended only for smaller setups. A dedicated database server is more stable and performant. All cluster members can write to the same database.
MariaDB Base installation and hardening
apt update
apt install -y mariadb-server
systemctl status mariadb
mysql
ALTER USER 'root'@'localhost'
IDENTIFIED BY 'SuperSicheresPasswort';
FLUSH PRIVILEGES;
EXIT;
Adjusting 50-server.cnf
First, we adjust the CNF file. It is located at /etc/mysql/mariadb.conf.d/50-server.cnf. Depending on the underlying setup, there are different possible appro
✅ V1 – small | 2 vCPU / 4GB RAM
➡️ conservative, swap-safe, stable, for 1–2 Technitium DNS nodes < 1 million queries per day
[server]

[mariadbd]

# Basic
pid-file                = /run/mysqld/mysqld.pid
basedir                 = /usr
bind-address            = 0.0.0.0
skip-name-resolve

# Performance – small host
innodb_buffer_pool_size         = 1G
innodb_log_file_size            = 256M
innodb_flush_log_at_trx_commit  = 2
innodb_flush_method             = O_DIRECT

innodb_io_capacity              = 800
innodb_io_capacity_max          = 1600

max_connections                 = 100
expire_logs_days                = 10

[mariadb-11.8]
✅ V2 – Standard | 4 vCPU / 8GB RAM
➡️ sweet spot, multiple Technitium DNS nodes, 5–20 million queries per day
[server]

[mariadbd]

# Basic
pid-file                = /run/mysqld/mysqld.pid
basedir                 = /usr
bind-address            = 0.0.0.0
skip-name-resolve

# Performance – medium host
innodb_buffer_pool_size         = 4G
innodb_log_file_size            = 1G
innodb_flush_log_at_trx_commit  = 2
innodb_flush_method             = O_DIRECT

innodb_io_capacity              = 2000
innodb_io_capacity_max          = 4000

max_connections                 = 200
expire_logs_days                = 10

[mariadb-11.8]
✅ V3 – large server | 6 vCPU / 16GB RAM
➡️ high load, many clients, multiple Technitium DNS nodes,> 20 million queries per day
[server]

[mariadbd]

# Basic
pid-file                = /run/mysqld/mysqld.pid
basedir                 = /usr
bind-address            = 0.0.0.0
skip-name-resolve

# Performance – large host
innodb_buffer_pool_size         = 8G
innodb_log_file_size            = 2G
innodb_flush_log_at_trx_commit  = 2
innodb_flush_method             = O_DIRECT

innodb_io_capacity              = 4000
innodb_io_capacity_max          = 8000

max_connections                 = 300
expire_logs_days                = 10

[mariadb-11.8]
After creating the CNF file, restart the MariaDB server with:
systemctl restart mariadbCreate user & database
We create the database “technitium_querylog” as well as the corresponding user “techdns” with the password “Secure123!” (the username and password can of course be chosen freely):
mysql -u root -pCREATE DATABASE technitium_querylog
CHARACTER SET utf8mb4
COLLATE utf8mb4_unicode_ci;
CREATE USER 'techdns'@'%'
IDENTIFIED BY 'Secure123!';
GRANT ALL PRIVILEGES
ON technitium_querylog.*
TO 'techdns'@'%';
FLUSH PRIVILEGES;
EXIT;
Connecting Technitium DNS with MariaDB
First, install the app “Query Logs (MySQL)” via “Apps” > “App Store” and then open the configuration:


The following configuration is designed for a VM with 2 vCPUs and 4 GB of RAM.
- maxQueueSize: this value can be increased accordingly on database servers with higher performance (200k, 500k, etc.) Excessively high values on low-performance database servers can lead to flush spikes and RAM overload.
- maxLogDays: the number of days the queries should be retained in the database
In the “connectionString” field, the IP address, port, username, and password must be adjusted according to your own setup.
{
  "enableLogging": true,

  "maxQueueSize": 200000,

  "maxLogDays": 60,
  "maxLogRecords": 0,

  "databaseName": "technitium_querylog",

  "connectionString": "Server=192.168.133.3;Port=3306;Uid=techdns;Pwd=Secure123!;SslMode=None;"
}
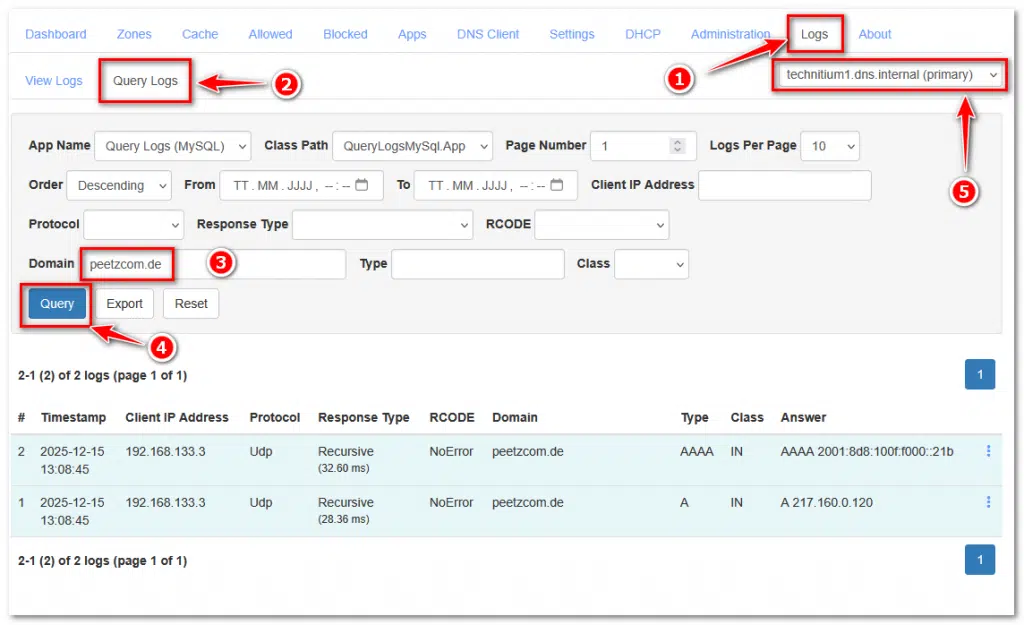
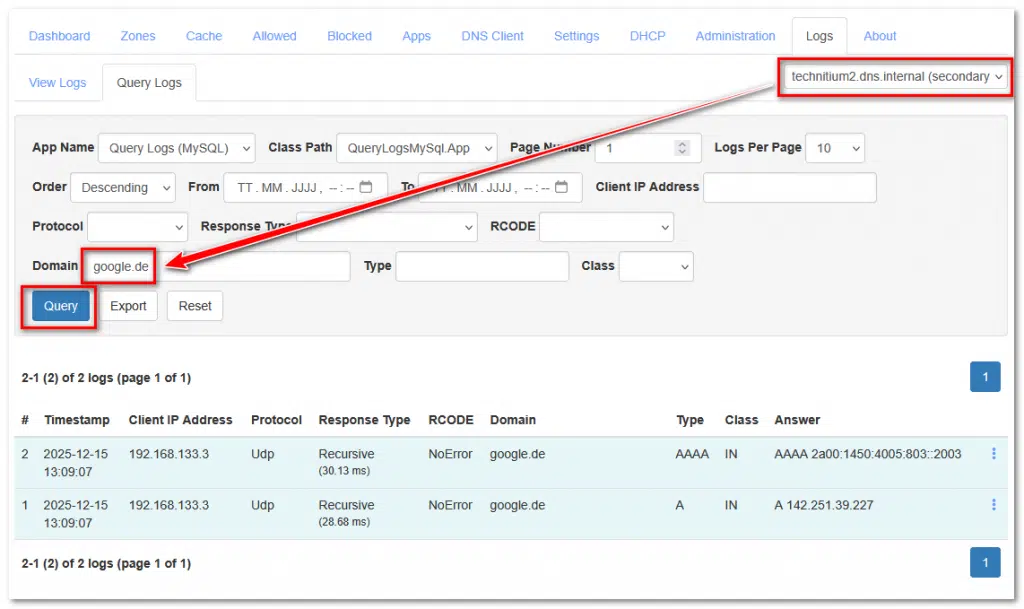
Final test - start lookup and query log
Auf einem beliebigen Client mittels NSLOOKUP jeweils eine Domain auf einem der Technitium DNS abfragen (in diesem Beispiel die 192.168.133.1 & 192.168.133.2:
nslookup peetzcom.de 192.168.133.1

nslookup google.de 192.168.133.2
Then, on one of the hosts, navigate to “Logs” > “Query Logs”. execute.
For the TLD peetzcom.de, the 1st server was queried; for google.de, the 2nd server. The server can be switched using the selection in the upper-right corner.: